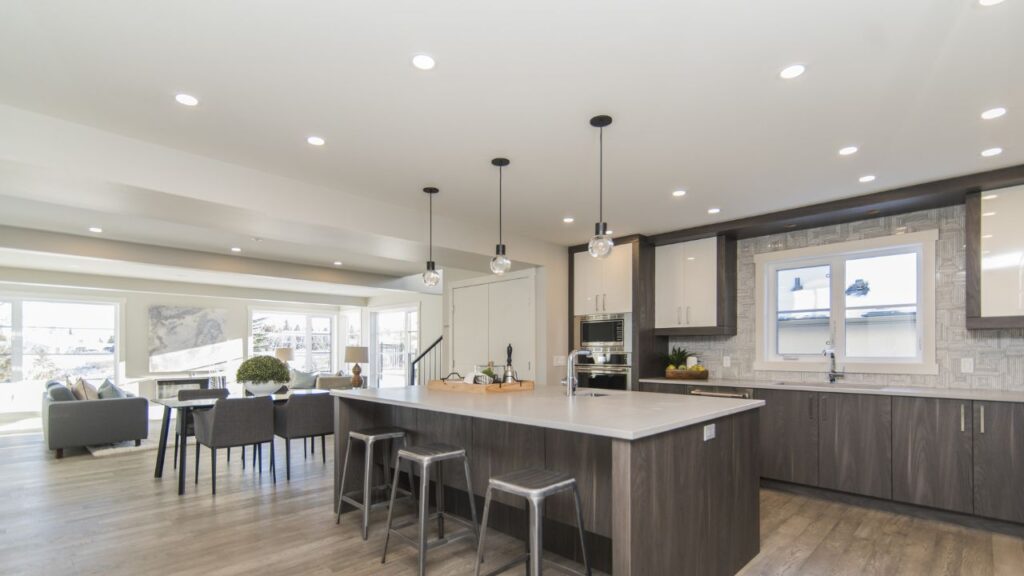
Estimating the Price of Painting Kitchen Cabinets
Materials and Techniques
Materials needed for painting kitchen cabinets
When painting kitchen cabinets, it is important to gather the necessary materials for the process to ensure a smooth and satisfactory outcome.
Some of the materials needed for painting kitchen cabinets include sandpaper, a primer, paint, a paintbrush or roller, and painter’s tape. The sandpaper is used to smooth out any imperfections on the surfaces of the cabinets, while the primer is necessary to provide a good base for the paint to adhere to. The paintbrush or roller is used to apply the paint, and painter’s tape is used to avoid getting paint on areas that should not be painted.
It is important to note that the type of materials used can also affect the outcome of the project. For example, high-quality paint can provide a more durable finish that will last longer, while a low-quality paint may not adhere well and can easily peel or chip. Additionally, the type of surfaces being painted, such as wood or laminate, can also require different types of materials for the best results.
The higher grades give you a longer lifespan and more protection against weather.
But, remember – wood shake roofs need more maintenance than other materials. The Spruce, a home renovation website, states that “high-quality wood roofs can last up to 60 years.” So, if you want an easy and cheap roofing job, pick a simpler house!
Primer
If you want successful results when painting kitchen cabinets, you need a preparatory base. This is known as a Cabinet coat primer. It works on previously-primed surfaces, finished wood, MDF, laminate, ceramic tile, glass and metal. Primer locks in stains and colours, so they won’t seep through the topcoat.
Cabinet primer creates an adhesive surface. Sanding and other prep methods are not needed thanks to its good adhesion. It can also conceal small imperfections, like knots and rough grain spots. Priming will also help prevent any sanding or peeling with age.
For long-term success, more than one coat of primer may be necessary. Check the manufacturer’s user manual for the amount needed based on porosity and local temperature/moisture.
Many users have had great results with Zinsser B-I-N 1 Quart Shellac and Valspar’s Multi-purpose Latex Primer. Low-end paints can cause respiratory problems over time, so it’s important to prime quality surfaces. So, don’t be afraid to embrace the mess and add ‘splatter’ to your design!
Paint
For kitchen cabinets, use paint that’s durable and smooth for a professional finish. Choose a top-quality paint that fits the cabinet material. Water-based paints are great for indoor use; they don’t have a strong odor and dry quickly. Oil-based paints are more durable, but take longer to dry. Use primer before painting for better adhesion and a smoother surface. Consider a sealant to protect your cabinets from moisture, stains, and chipping.
Acrylic enamel paint is quick drying, easy to clean with water, and has low VOCs. Alkyd enamel is oil-based; it can be cleaned with solvents and is durable and resistant to scratches and wear. However, it produces more VOCs while painting. Latex paints are water-based, making them eco-friendlier. But they need more primer coats than other paints.
Pick a color that matches your kitchen’s style. Light colors, like off-white or light gray, make a kitchen look bigger and brighter.
Bob Vila Home Improvement portal reports that painting cabinets is cheaper than replacing them. The cost starts from $300-$1000. Sandpaper is necessary for a smooth surface.
Sandpaper
A Smoothing Tool is key for painting kitchen cabinets. It can make surfaces even, removes bumps and ridges. Without it, the process may be harder and take longer.
For best results, match the tool to the job. Sandpapers with grits between 120 and 220 are great for smoothing new cabinets before painting. Bob Villa suggests silicon carbide paper with a 120-220 grit range.
Using the right paintbrush is essential, like using a fork for soup!
Paintbrushes
Paint Applicators:
When it comes to painting kitchen cabinets, having the right paint applicators is key. Consider these six points when picking the perfect ones:
- Go for quality brushes with synthetic bristles.
- A smaller brush is better for corners and edges.
- Synthetic bristles are good for water-based paints, while natural bristles are better for oil-based.
- Foam rollers can be used for large surfaces, but they may leave a stippled finish.
- Use an airless sprayer or rent one from a hardware store for spray paint.
- Clean your brushes between coats to avoid buildup and get quality results.

Don’t forget to stay within budget when buying brushes. Pro Tip: Invest in quality cleaning materials to make your paintbrushes last longer.
Painter’s tape: For pro-looking kitchen cabinets.
Painter's tape
Painter’s tape has five incredible benefits! Firstly, it allows us to create clean and straight lines while painting. Secondly, it stops paint from bleeding onto unwanted surfaces. Thirdly, it acts as a safeguard, shielding surfaces that don’t need paint. Fourthly, it’s an easy and cost-effective way to get professional-looking results. Lastly, it can be removed effortlessly without leaving any residue or damaging the surface.
Plus, painter’s tape is usable on delicate surfaces too! Plus, you can find it in different widths, so you can get the right size for your project.
Pro Tip: Before applying painter’s tape, make sure the painting surface is dust-free and dry. This will stop it from slipping off while you’re using it. Also, if you use a drop cloth, you won’t have to spend hours scrubbing paint off your floors! #winning
Tired Of Fighting With 4 Other Contractors To Win New Leads?
We help contractors find new customers with high-converting websites and locally targeted niche-specific lead-generation programs. You’ll never need to worry about running out of work again! We focus on quality over quantity with our leads for contractors.

Drop cloth
Protective Fabric for the Painting Process
Drop cloths can help protect floors and furniture from paint splatters. These come in many sizes, materials, and thicknesses to suit everyone’s needs. Investing in quality protective fabric can make a painting project go smoothly and without mess.
Not using a drop cloth can lead to costly repairs. I learned this the hard way, when I helped my friend with her kitchen cabinets. We ended up with paint stains on her beautiful hardwood flooring which cost a lot to repair.
Using protective fabric when painting is essential to avoiding costly damage. It’s the perfect way to turn your space into a Pinterest-worthy nightmare without breaking the bank!
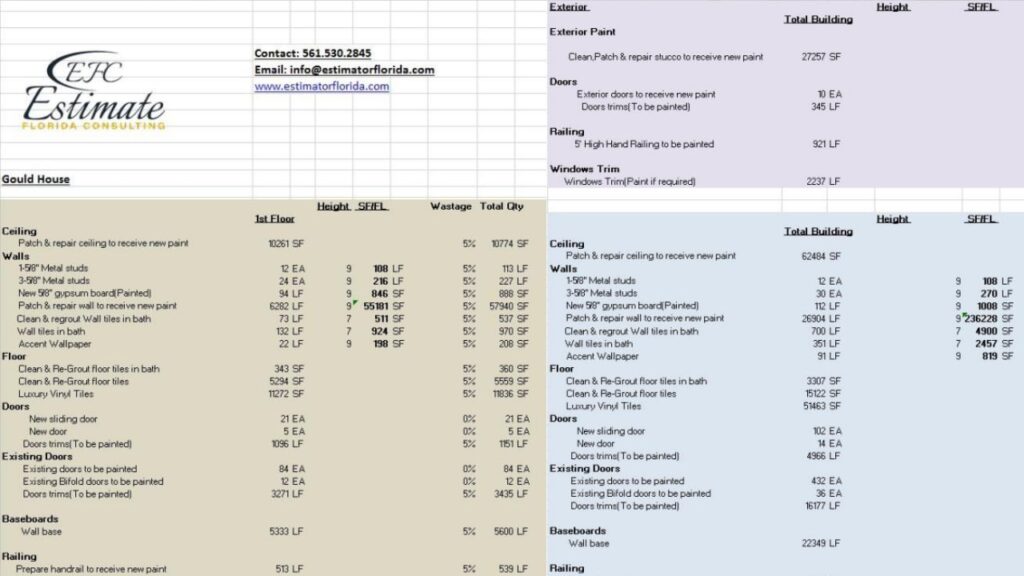
Materials needed for painting kitchen cabinets
When prepping to paint kitchen cabinets, a decisive step is to guess the cost of items needed. This helps with proper budgeting and avoiding unwanted costs.
In the table below, we list the estimated cost of materials for painting kitchen cabinets depending on the kind of material and their prices.
Materials | Price per unit | Estimated Cost |
|---|---|---|
Paint | $30 per gallon | |
Primer | $25 per gallon | |
Sandpaper | $10 per pack | |
Cleaning Solution | $15 per bottle |
Remember that these guesses may change based on the size of your kitchen and how many cabinets you plan to paint. Also, if you hire a professional painter, labor costs need to be accounted for.
Pro Tip: To have precise estimates, it’s best to consult a pro painter or an expert in this area. They can guide you through the entire process and give accurate estimates. Techniques for painting kitchen cabinets: to avoid them looking like a kindergartener’s art project.
Techniques for painting kitchen cabinets
Painting kitchen cabinets is a challenging, yet rewarding project. To achieve excellent results, you need to understand the techniques for painting kitchen cabinets. Here’s a guide to help you get started:
- Prep Work: Before you start painting, remove all hardware, clean the cabinets, and sand them down. Fill in any gaps, holes, or cracks with wood filler and sand again. Once the surface is smooth and clean, you can move on to the next step.
- Painting: Begin by applying a primer to the cabinets, and then let it dry completely. Once the primer has dried, apply the first coat of paint using a brush, roller, or sprayer. After the first coat has dried completely, you can sand the surface lightly and apply a second coat of paint.
- Finishing: Once the final coat of paint has dried, you can reattach the hardware, and your kitchen cabinets will look like new.
It’s important to note that you can also choose different painting techniques, such as distressing, glazing, or antiquing, to achieve a unique look for your cabinets. Remember to always use high-quality paint for long-lasting results.
As a Pro Tip, don’t rush the process. Take your time and do it correctly for the best results. Get ready to embrace the chaos and cover every inch of your kitchen in plastic sheets, because preparation before painting is key to avoiding a disastrous renovation.
A Wining Cost Estimate
That Helps You To Win More Painting Construction Projects
Preparation before painting
Before you apply fresh paint to your kitchen cabinets, you must take some steps to prepare them. Follow these four easy steps:
- Take out all the items inside and outside the cabinets.
- Clean the surfaces with soap and warm water.
- Sand the cabinets lightly to roughen the surface.
- Put a layer of primer on the cabinets to help the paint stick better.
Look out for any cracks or dents on the cabinet surfaces and fill them with wood filler before sanding. This can give a great finish that lasts longer.
You must also consider other factors for preparing your kitchen cabinetry surfaces before painting. Like, do you need to replace any parts and check if there are any underlying issues such as moisture damage or mold?
The original painters used natural ingredients like roots, berries and flowers and mixed them with oil or egg yolk to create colors. Over time, new ways of creating colors have been developed, leading to more modern scientific methods.
Finally, don’t forget to take off the cabinet doors and hardware, as it’s a sign of accepting that your cabinets need a new look!
Removing cabinet doors and hardware
Labelling each door and cabinet with masking tape is key for a successful paint job. Then, remove all hinges, knobs, handles or pulls.
Clean surfaces with soap and warm water. Fill gaps and imperfections with wood putty and let it dry. Sand lightly and find a place to store the doors while they dry. Removing all hardware beforehand prevents messes and makes it easier for painting crews.
Cleaning cabinets is like therapy – if only you had someone to talk to!
Cleaning cabinets
Keep your kitchen cabinets looking spotless with these helpful steps!
- Empty out the cabinets
- Wipe with a microfiber cloth and soapy water
- Rinse with a plain water-dampened cloth
- Dry before putting items back in
For tougher dirt, try vinegar or baking soda solutions.
Research says over 1/3 of Americans replace their cabinets when revamping their kitchen.
DIY-lovers, get ready to pump those biceps! Sanding cabinets is a great workout.
Sanding cabinets
Smoothing out the cabinet’s surface is important for a smooth paint job. Sanding correctly creates a perfect surface. Follow these 5 steps for sanding cabinets:
- Take off all hardware pieces, such as handles, knobs and hinges.
- Start with coarse-grit sandpaper to remove layers of paint. Keep using fine-grit sandpaper until the area is smooth.
- Use a tack cloth to clean up any dust.
- Gently sand hard-to-reach areas or use an old toothbrush.
- Wash off residue from the cabinets and let it dry.
Remember to focus on hard-to-reach places like corners and edges. Applying wood conditioner during the sanding process also helps, especially for porous woods that absorb moisture.
Sanding gives texture, improved adherence for primers and paints, and brings out unique natural elements in your cabinets. So, priming your kitchen cabinets is worth the effort – like prepping for a first date!
Get Financing For Painting Construction Business
Maximize your painting construction business’s potential with our competitive financing options

Applying primer
For perfect paint adhesion and a uniform finish on kitchen cabinets, applying a primer is key. This preparation stage makes sure that the paint sticks to the cabinet surface.
- Clean the cabinets with warm soapy water to get rid of any grease, dirt or grime. Rinse off with clean water and let it dry.
- Rough up the surface of the cabinets with sandpaper or deglosser liquid. It will help create a strong bond between primer and wood.
- Apply primer with a brush or roller in thin and even coats. Allow the first coat to dry before applying another one. The number of coats depends on the cabinet color – darker surfaces may need extra priming.
To get full coverage and minimize undercoating, use an enamel-based paint on top of the primer for kitchen cabinets.
Oil-based primer is essential if you have stained or bare wood cabinetry.
A fun fact – according to BobVila.com, experienced DIY-ers can save hundreds of dollars by painting their kitchen cabinets instead of hiring pros.
Choose your primer wisely – otherwise, your cabinets may be seen as a ‘failed DIY’ attempt!
Choosing the right primer
Choosing the perfect primer for cabinet-painting is essential. Here are some tips:
- Check the cabinet material and pick a suitable primer.
- Go for high-quality primer that won’t wet or pool up.
- Oil-based or shellac-based primer for stained or glossy cabinets.
- Water-based primers are quick-drying and low-odor.
- Chalk paint? Opt for tinted or clear wax instead of priming.
When shopping for primers, do your homework! Like when my friend was picking a car color, don’t forget the important details. Lay it on thick like a triple-layered lasagna. Follow the manufacturer’s recommendations for the best results!
Applying primer to cabinets
Applying the basecoat is the 2nd step to getting a glossy finish on your cabinets. Here’s what you do:
- Wash ’em and let dry.
- Sand the surfaces with medium-grit sandpaper. Wipe with a tack cloth.
- Use a brush or roller to apply primer. Make sure it’s even.
- Let the primer dry for a few hours before adding paint.
Choose the right primer. It’s important. Wood cabinets need water-based primer. Metal – oil-based.
My friend didn’t use primer when painting her kitchen cabinets. The paint peeled off in 2 weeks. We had to strip it and start again with primer. Make your kitchen cabinets fab with paint and determination!
Painting cabinets
Want to refresh your kitchen? Painting cabinets is a budget-friendly idea! Here’s a 6-step guide:
- Remove cabinet doors & hardware.
- Clean with degreaser.
- Sand with fine-grit sandpaper.
- Apply primer.
- Paint with high-quality paint & brush/roller.
- Reinstall when paint is dry.
For a personalized touch, add stenciled designs or contrasting colors to open shelves. Label all doors & hardware during removal for easier reassembly. Pro-tip: choose paint specifically formulated for cabinets for maximum durability. The wrong paint can turn your kitchen into a disaster, but the right one can create a masterpiece!
A Wining Cost Estimate
That Helps You To Win Painting More Construction Projects
Choosing the right paint
Picking the Perfect Paint for Kitchen Cabinets?
Painting kitchen cabinets can be a daunting task. The paint choice is key, as it determines the look, cost and longevity of the finished product. Consider these four points when choosing the perfect paint:
- Opt for a high-quality paint to prevent peeling, cracking, and chipping.
- Use a gloss or semi-gloss finish paint for durability and ease of cleaning.
- Think about water-based paints over oil-based paints – they dry quicker and produce fewer fumes.
- Pick a color that fits your theme and won’t make the kitchen look smaller.
When picking the right paint, there are other small things to remember too. Make sure the area is well-ventilated, use good quality brushes and rollers.
Have you ever thought about the story behind the perfect kitchen cabinet paint? Manufacturers have introduced many new variants like colored resin fillers to improve cabinet coatings. Historically, people used linseed oil varnishes, but their slow drying speed meant switching to other options. Knowing how past errors lead to advancements helps us use them better in our lives! If painting starts to feel like a therapy session, take a break and go paint your nails instead.
Applying primer to cabinets
Want to give your kitchen cabinets a fresh look? Knowing the right techniques for revamping is key. Applying paint is an essential step. Here’s what to do:
- Clean surfaces with degreaser, sandpaper and priming.
- Paint in thin, smooth strokes using a high-quality brush. Avoid drips and marks.
- If needed, apply another coat after they dry. Repeat until you achieve the desired color depth.
- Let the paint dry according to its instructions.
Be sure to address all aspects of the painting process carefully. Doing this will help keep your cabinets looking sharp for longer.
Wood tones or glossy textures require extra preparation. Get the right gear and allocate more time to complete these finishes.
Kitchen remodeling has a long history. In the past, people would spend hours sanding and oiling wooden materials. Today, you can use modern tech and tutorials to customize cabinets to your liking.
Paint your kitchen cabinets – the most cost-effective way to have a brand new kitchen!
Estimating the cost of labor for painting kitchen cabinets
Calculating Labor Costs for Painting Kitchen Cabinets
Calculating the cost of labor for painting kitchen cabinets is an essential part of budgeting for a renovation project. The complexity of the job, the experience of the painter, and the type of paint used are all factors that affect labor costs.
Table for Estimating Labor Costs for Painting Kitchen Cabinets
This table demonstrates the factors that influence the cost of labor for painting kitchen cabinets.
Factors Affecting Labor Costs | Average Cost |
|---|---|
Cabinets’ Size | $300 – $1,000 |
Complexity of Job | $400 – $1,500 |
Experience of Painters | $30 – $70/hour |
Type of Paint | $30 – $80/gallon |
The cost ranges from $300 to $1,000 for cabinets’ size, $400 to $1,500 for the complexity of the job, $30 to $70 per hour for the experience of painters, and $30 to $80 per gallon for the type of paint used.
Essential Information on Labor Costs for Painting Kitchen Cabinets
When calculating the cost of labor for painting kitchen cabinets, it is essential to consider the preparation work required, such as sanding and filling in gaps and holes. The condition of the cabinets also impacts the labor cost. Cabinets that are structurally unsound require more labor costs during the preparation stage.
According to the Home Advisor, labor costs for painting kitchen cabinets average around $1,200 – $7,000. DIY painting your kitchen cabinets? Sure, if you want to live off takeout for the next month.
DIY vs hiring a professional
DIY can save money, but hiring a pro has benefits too. They have years of experience and the right tools. Plus, DIY requires learning, prep work, and clean-up. Repairing mistakes might cost more than hiring a pro. Consider budget, time, and experience when choosing.
For a good finish, you need to know materials used. Experience and exposure help with this. So, talk to an experienced professional before doing DIY cabinet painting
If they can paint a realistic-looking avocado on the wall, they’re likely worth hiring for kitchen cabinets!

Factors to consider when hiring a professional
Getting a pro for cabinet painting necessitates assessing multiple elements, including their aptitude and experience. Five subcategories can be used to contemplate when employing pros:
- Proficiency and Expertise – It is vital to ascertain that the recruited professional has experience in cabinet painting specifically. Moreover, they must possess the required skill to do this job accurately.
- Work Quality – The work quality should always be a priority when engaging professionals. Inspect past projects or check references to ensure they can offer satisfactory results.
- Budget – Prior to hiring a professional, it’s pivotal to have an exact understanding of how much the job may cost. Always consult estimates initially and in detail.
- Timeframe – Speak about the timeframe within which you need the task completed before beginning with your expert so they can plan their work suitably.
- Credentials – Engaging approved and insured painters will help you save money and comply with the law while avoiding any unanticipated damage to your property.
When selecting professionals for cabinet painting, you may want to think about their availability during holidays or weekends.
Pro Tip: Always read contracts attentively before putting pen to paper or beginning work on your project. Contracts comprise critical details such as the work scope, payment terms, timelines etc., which must be grasped before hiring professionals for your work.
Experience
Prior experience in painting kitchen cabinets is key for a successful, smooth process. Experienced painters know the prep work needed and possess the necessary skills for a top-notch result. They can tackle any issues that come up, like cracked or damaged surfaces. Plus, they need less time than amateurs, meaning lower labor costs.
Experts use high-quality paint and tools that give a crisp finish and ensure the longevity of the painted cabinets. To save money,
homeowners can consider refinishing instead of replacing. This gives their cabinets a new look, at a fraction of the cost. Remember, location affects the price of labor too!
Location
Labor costs for painting kitchen cabinets vary by region. Factors like cost of living, competition, and taxes affect the price. Some locations may charge more due to complexity or high demand. Coastal cities or urban centers may have higher labor costs due to popularity.
When getting estimates, consider experience, expertise, licensing, training, and certifications. This will ensure quality workmanship and value.
Don’t miss out on accurate estimates from local contractors. Schedule a consultation today to get your kitchen cabinets painted well, and at an affordable rate. Remember, even small kitchens can have more cabinets than a Kardashian has shoes!
A Wining Cost Estimate
That Helps You To Win Painting More Construction Projects
Size of the job
Size of Kitchen Cabinet Painting Project:
Calculating the cost involves figuring out the scale. A larger area needs more labor and materials than a smaller one. Thus, assessing the size helps to make a precise and reasonable expense estimation.
Here’s a Table of Estimated Cost Based on Surface Area:
Surface Area (Sq. Ft) | Estimated Labor Cost |
|---|---|
Up to 100 | $300 – $600 |
101 to 200 | $500 – $1,000 |
201 to 300 | $700 – $1,400 |
301 to 400 | $800 – $1,600 |
The type of paint finish or colors chosen could also affect the pricing.
Considerations for Surface Area-Based Cost Estimations:
Using surface area for cost estimations is just a guide. It’s necessary to think of other factors like layering needs and repair requirements before settling with an estimate.
A DIY Approach Is Suggested:
Although getting experts seems convenient for time-sensitive tasks or when lacking the necessary skills, homeowners can save money by painting their cabinets by themselves. Starter guides and tutorial videos make it easier for non-specialists. Taking a DIY approach reduces labor expenses and gives hands-on experience.
Fear not the bill! Do-It-Yourself and save money.
Conclusion
The cost of painting your kitchen cabinets depends on several factors such as the materials and techniques used. To calculate the total cost, we’ve evaluated each component of cabinet painting. Check the table below for an estimate of the costs.
Factors | Cost Range |
|---|---|
Labor | $300 – $800 |
Primer and Paint | $200 – $400 |
Brushes and other supplies | $30 – $100 |
Costs may vary depending on the project, location, etc. Apart from the estimates, include any extra expenses like sanding and hardware replacements in your budget.
When planning, think about upgrades like pull handle replacements or extra coats of paint if necessary. Repainting instead of replacing entire doors can save money. High-quality paint will help increase durability and reduce future maintenance.
FAQs
There are several factors that can affect the cost of painting kitchen cabinets, including the size of the kitchen, the type of paint and finish you choose, whether or not the cabinets need to be sanded or stripped before painting, and whether or not you hire a professional painter.
The cost of painting kitchen cabinets can vary widely depending on the factors listed above. On average, homeowners can expect to pay between $1,000 and $5,000 for a professional cabinet painting job.
It is generally recommended to remove the cabinet doors before painting in order to ensure that the paint goes on evenly and smoothly. If you choose to leave the doors on, you may need to sand and clean them thoroughly beforehand to ensure that the paint adheres properly.
In most cases, yes. However, it is important to thoroughly clean and sand the existing finish before painting in order to ensure that the new paint adheres properly. It is also important to note that painting over certain types of finishes, such as glazed or heavily varnished cabinets, may require a different technique.
There are several types of paint that are suitable for painting kitchen cabinets, including oil-based and water-based paints. It is important to choose a high-quality, durable paint that will hold up well over time, and to select a finish that is appropriate for your kitchen (e.g. glossy or matte).
If you are an experienced DIYer with plenty of time and patience, you may be able to tackle a cabinet painting project yourself. However, if you lack experience or are short on time, it may be best to hire a professional painter to ensure that the job is done to your satisfaction.
Process To Get Painting Construction Cost Estimate Report
Here I am going to share some steps to get your painting construction cost estimate report.
-
You need to send your plan to us.
You can send us your plan on info@estimatorflorida.com
-
You receive a quote for your project.
Before starting your project, we send you a quote for your service. That quote will have detailed information about your project. Here you will get information about the size, difficulty, complexity and bid date when determining pricing.
-
Get Estimate Report
We do painting construction cost estimating and prepare a detailed report for your project. At last, you finalize the report and finish the project.